
If you are an exclusive pumping mom or a parent navigating the endless cycle of newborn feedings, you know the drill: wash, rinse, sterilize, dry, repeat. In the first year of your baby's life, keeping feeding essentials sanitary is critical. As the NHS (National Health Service) advises, all feeding equipment must be sterilized before every use to protect your baby's developing immune system.
But when you are dealing with bulky bottles and intricately shaped wearable breast pump parts, a standard sanitizer simply won't cut it. If you're exhausted by constant boiling and air-drying, it's time to upgrade. Welcome to your ultimate 2026 guide on finding the best bottle sterilizer and dryer, designed specifically to handle both bottles and complex breast pump parts with ease.
1. Why You Need a Dedicated Sterilizer for Breast Pump Parts
Breast milk is liquid gold, but the fat in human milk easily clings to the microscopic crevices of breast pump valves, flanges, and duckbills.
According to the FDA's official breast pump cleaning guidelines, these milk residues are a breeding ground for bacteria. While older guidelines sometimes suggested sterilization wasn't strictly necessary for every pump session, modern CDC guidelines on infant feeding emphasize that for babies under 3 months, premature infants, or those with weakened immune systems (NIH research on neonatal immunity), rigorous sterilization is a daily must.
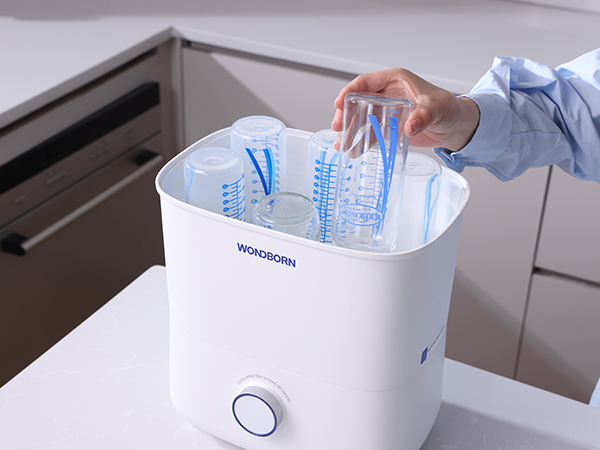
Finding a true sterilizer for breast pump parts is challenging because wearable pumps have large, uniquely shaped collection cups that simply do not fit in compact microwave boxes. You need an appliance with a large capacity and customizable interior to ensure steam reaches every angle.
2. Boiling Water vs. Electric Steam Sterilizer: The Ultimate Comparison
For decades, boiling water bottle sterilization was the standard. But as Healthline's sterilization guide points out, the modern electric steam sterilizer has revolutionized newborn care.
| Feature | ❌ Boiling Water Method | ✅ Electric Steam Sterilizer & Dryer |
|---|---|---|
| Time & Effort | Requires constant monitoring over a hot stove (15+ mins). | One-step operation. Push a button and walk away. |
| Drying Method | Air-drying on a rack. Exposes wet parts to airborne dust. | Built-in HEPA drying. Concentrated, filtered air dries items completely. |
| Material Safety | Uncontrolled rolling boils can warp silicone parts and degrade plastics. | Controlled steam protects silicone, plastics, and glass. |
| Compatibility | Hard to submerge buoyant wearable pump cups completely. | Spacious design with dedicated accessory baskets for even distribution. |
| Safety Risk | High risk of burns from carrying heavy pots of boiling water. | Enclosed, heat-resistant barrel with auto-shutoff features. |
3. Must-Have Features in the Best Bottle Sterilizer Dryer
When upgrading your routine, you shouldn't have to compromise between space, hygiene, and convenience. Here are the 5 non-negotiable features you should look for in 2026:
- Massive Capacity & Universal Compatibility: Finding a true large bottle sterilizer that fits wearable pump parts without cluttering your kitchen is rare. We designed our machine with an extra-spacious interior to hold up to 12 standard-neck 8oz bottles.
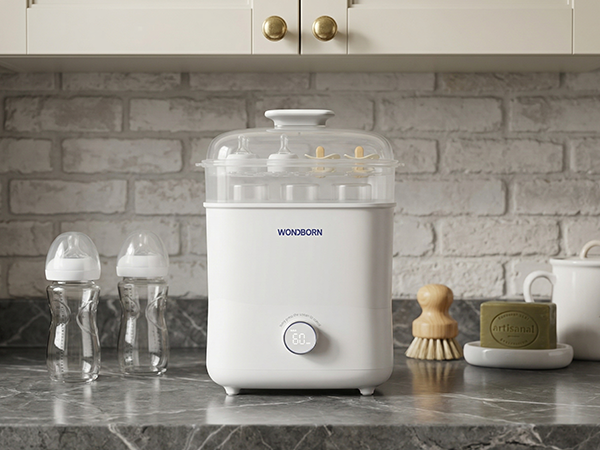
- 99.999% Deep Sterilization: To protect your baby from severe pathogens like Cronobacter, our sterilizer offers a dedicated 60-minute Auto Mode that delivers 99.999% high-efficiency deep sterilization.
- HEPA-Filtered Hygienic Drying: Fungal infections like oral thrush thrive in damp environments. Our machine is equipped with a premium HEPA filter and specialized airflow concentrators.
- 72-Hour Sterile Storage: Instead of leaving parts on a counter, our machine keeps your baby’s essentials safely sealed and sterile for up to 72 hours.
- Intuitive Controls: Our upgraded LED control knob and digital countdown timer remove all the guesswork, even for sleep-deprived parents at 3 AM.
4. Step-by-Step: How to Clean and Sterilize Your Pump Parts
- Step 1: Wash Immediately. As recommended by the FDA, take apart all valves and membranes and wash in hot, soapy water.
- Step 2: Load and Sterilize. Place washed parts into the 4-in-1 sterilizer. Select the Auto Mode (Sterilize + Dry).
- Step 3: Safe Storage. Once dry, store your pump parts inside the machine to maintain sterility.
Frequently Asked Questions
Conclusion: Reclaim Your Time
You can't pour from an empty cup. By investing in the best bottle sterilizer and dryer, you are ensuring your baby's safety while giving yourself the gift of time. Stop boiling, start living, and enjoy those precious moments with your newborn.